You’re about to drop anywhere from $50 to $5,000 on your first drone, and roughly half the advice you’ll find online is either outdated or written by someone trying to sell you their affiliate link. I know because I’ve spent the last four years flying drones, crashed about a dozen of them, registered three with the FAA, and currently own five ranging from a toy to a $1,400 camera platform. What beginners actually need to know fits on a single page. The rest is noise.
Buy the DJI Mini 4 Pro and Stop Overthinking It
I’m not going to be diplomatic about this. If you’re new to drones and you spend three weeks comparing spec sheets and watching YouTube comparison videos, you’re wasting your time. Get the DJI Mini 4 Pro. Done. I’ve flown stuff from DJI, Autel, Skydio, Holy Stone, and a handful of no-name Amazon brands that arrived in packaging held together with hope and packing tape. None of them come close to what the Mini 4 Pro offers at its price point.
Why am I so annoyed about this? Because every beginner forum is full of people recommending cheaper alternatives that’ll frustrate you into quitting the hobby within a month. A $150 drone with no obstacle avoidance, a camera that shoots 1080p on a good day, and eight minutes of battery life isn’t “a great way to learn.” It’s a great way to hate drones.
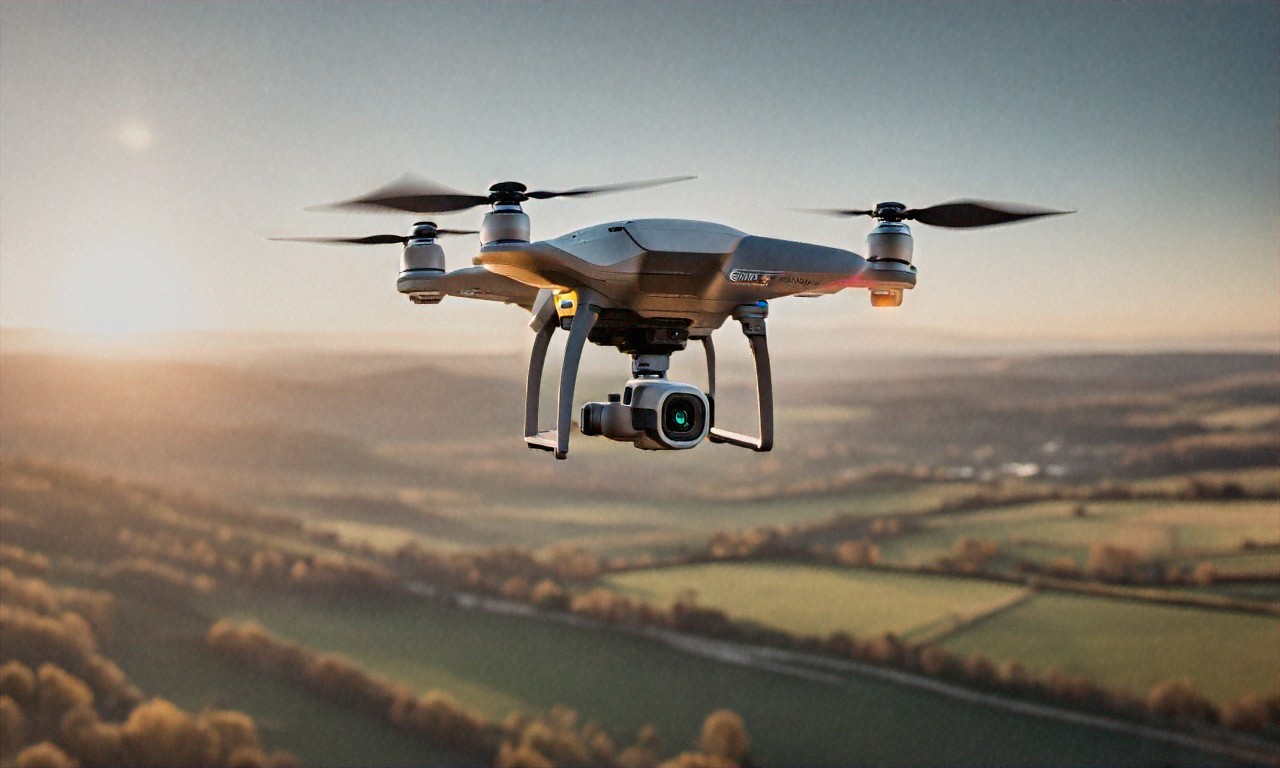
So here’s what you actually get with the Mini 4 Pro. It weighs 249 grams. I’ll get to why that number matters in a second. It shoots 4K video at 60fps. Takes 48MP photos. Has obstacle avoidance sensors on every single side: front, back, left, right, top, bottom. Flies for up to 34 minutes per battery. Three years ago, those specs would’ve cost you $1,500 or more. The Mini 4 Pro Fly More Combo runs about $960, base model around $760.
Can I just talk about the obstacle avoidance for a second? When you’re about to fly into something, the drone stops itself. Just stops. You know how many trees and fences and buildings I would’ve hit without that feature? All of them. Literally every single one. Beginners today don’t realize how good they’ve got it.
And the camera, look, for something that weighs less than a can of soda, the image quality is kind of wild. The 1/1.3-inch CMOS sensor handles low light way better than any sub-249g drone that came before it. I’ve shot golden hour footage that honestly looks cinematic. Smooth, warm, plenty of detail. There’s a built-in ND filter bracket too, though you’ll have to buy the actual filters separately. For YouTube videos, social media stuff, vacation memories, hiking clips: it punches way above its weight. Pun intended, I guess.
Drone Regulations Will Ruin Your Day If You Ignore Them
Okay. I need you to actually read this section. Don’t skim it. Don’t skip ahead to the “cool footage tips” part. Because here’s what drives me crazy: people drop $800 on a drone, take it to a park next to an airport, and then act surprised when the FAA sends them a letter. Drone regulations aren’t suggestions. They’re federal law. Civil penalties go up to $27,500. Criminal penalties can hit $250,000 and prison time. I know a guy who got slapped with an $1,100 fine for flying over a football stadium. He thought the rules were “more like guidelines.” They’re not.
In the US, all of this falls under the Federal Aviation Administration. Two categories of operators matter to you: recreational flyers and Part 107 certified remote pilots. Flying for fun, photos on a hike, filming your kid’s soccer game, doing flips in an open field? Recreational. Making money from your footage in any way, selling photos, filming weddings, inspecting roofs for a client? You need Part 107. No gray area. Money changes hands, you need the certificate. Full stop.
Rules for Recreational Flyers
Pretty straightforward stuff, but people still manage to get it wrong.
Registration first. Any drone over 0.55 pounds (250 grams) has to be registered with the FAA. And this is exactly why the Mini 4 Pro’s 249-gram weight is such a big deal, it sneaks right under that threshold. Technically you don’t have to register it. But I’d probably still recommend doing it anyway. It’s $5 for three years, and it covers you if regulations shift or if you slap on accessories that push the weight over 250 grams. A screen protector and a couple stickers could theoretically tip the scale.
Then there’s the TRUST test. Stands for The Recreational UAS Safety Test. Free. Online. Takes maybe 30 minutes. Covers basic airspace rules, safety stuff, regulatory knowledge. You genuinely can’t fail it — they give you the correct answers if you mess up a question. More of an educational walkthrough than an actual exam. But you’ve gotta have your TRUST certificate on you (phone is fine) whenever you fly. Places like the Academy of Model Aeronautics and the Drone Racing League offer it.
Operational rules, and I’m going to list these because I see beginners break at least two of them on their first outing: fly below 400 feet above ground level. Keep the drone within your visual line of sight at all times. Don’t fly over uninvolved people. Don’t fly in controlled airspace near airports without authorization. Don’t fly impaired. Always yield to manned aircraft. “Visual line of sight” means YOUR eyes on the drone, not watching through the camera feed on your phone screen. And controlled airspace stretches further from airports than most people assume. Way further.
Part 107: Getting Your Commercial License
If you want to make money flying, and from what I’ve seen, most people eventually do once they realize how good their footage looks, you’ll need the FAA Part 107 Remote Pilot Certificate. Proctored knowledge test at an FAA-approved testing center. $175, 60 multiple-choice questions, 70% to pass. Pass rate hovers around 90% for people who actually study, so it’s not brutal. But it’s not a joke either.
What’s on it? Airspace classification (Class A through G: know all of them). Weather theory including METAR reports, cloud clearance requirements, wind effects. Airport operations. Radio communication basics. Drone performance characteristics. Emergency procedures. FAA regulations. Weather and airspace are where most people trip up. I spent roughly three weeks studying through Pilot Institute’s online course, which I’d recommend. Tony Northrup also has a free Part 107 study guide on YouTube that covers the whole test and it’s genuinely good.
Your certificate lasts two years before you need a recurrent knowledge test, which is shorter and easier than the original. With Part 107 you can fly commercially, fly over people (depending on drone category), fly at night, and request airspace authorizations through LAANC. Honestly though, even if you never fly commercially, the knowledge alone makes you a dramatically safer pilot. I got mine after about six months of recreational flying and it changed how I think about every flight.
LAANC. Stop Flying Illegally Near Airports
This one really gets under my skin. The number of beginners who fly in controlled airspace without authorization is staggering, and most of them don’t even know they’re doing it. If you live anywhere near an airport, and way more people do than realize it) you might not be able to just launch from your backyard without permission. Controlled airspace wraps around every airport in the country, and in cities, these zones overlap all over the place.
Good news though. LAANC (Low Altitude Authorization and Notification Capability, makes getting permission fast and usually instant. DJI’s Fly app has it built in. You can also use Aloft (used to be called Kittyhawk) or AirMap. Tell the system where you want to fly and at what altitude, and it either auto-approves or denies with an explanation. Most requests in pre-approved zones clear within seconds.
Before LAANC existed? You had to submit a written request to the FAA and wait weeks. Sometimes months. So most recreational flyers just.. didn’t bother. Which was both illegal and dangerous. LAANC fixed that problem almost completely. It takes 30 seconds. Use it. There’s zero excuse not to at this point.
Your First Flight, Step by Step (Learn From My Disasters)
Alright. You’ve got the drone. Passed the TRUST test. Checked that your location is clear of airspace restrictions. Time to actually fly. And I’m going to walk you through this carefully, because my first flight involved a fence, a frightened cat, and a drone that looked like it lost a fight with a lawnmower. Yours doesn’t have to go that way.
Pick the right spot. Big open area. No trees, no power lines, no buildings, no people nearby. A soccer field works great. Empty parking lot. Open park. Do NOT fly in your backyard for the first time. I know. You’re excited. It’s right there. But your backyard is an obstacle course and you don’t have the muscle memory to deal with it yet. That fence I mentioned? Still has a dent.
Check weather. Wind is the enemy. The Mini 4 Pro handles winds up to about 24 mph, but as a beginner you shouldn’t be out in anything over 10-12 mph. Light wind teaches you to fly. Heavy wind teaches you to panic. And check wind speed at drone altitude, not ground level; it’s almost always windier 100 feet up than where you’re standing. The app UAV Forecast is great for this. Gives you wind speeds at various altitudes plus other flight-relevant weather data.
Pre-flight check. Inspect propellers for cracks or chips. Remove the gimbal cover (you’d be amazed how many people forget this). Confirm both batteries are full, drone and controller. Make sure your phone is charged with the DJI Fly app updated. Set the drone on a flat surface, power it on, then power on the controller. Wait for GPS lock. The app shows satellite count, wait for at least 10 before you take off. This gives you stable hovering and a reliable return-to-home function.
Take off and hover. That’s it. Seriously, that’s your whole first flight plan. Lift off, hover at about 6 feet, and just.. look at it. Listen to how it sounds. Watch how it drifts (or doesn’t drift, because GPS hold on the Mini 4 Pro is rock solid). Let go of the sticks. It’ll just hang there. Breathe. You’re flying a drone. Pretty cool. But stay calm.
Practice basic movements. Right stick forward, drone goes forward. Pull back: comes back. Left and right on the right stick for strafing. Left stick handles altitude (up/down) and rotation (left/right yaw). Make a square: forward, strafe right, backward, strafe left, back to start. Try a circle. Fly to a specific point and return. Spend your entire first battery on this. Don’t try to get cool footage yet. Don’t go fast. Don’t go high. Just build control.
Mistakes I Made So You Don’t Have To
Going too high too soon. Yeah, I get it. You want the 400-foot view. But altitude makes everything harder. Orientation gets confusing, is the drone facing toward me or away? Wind picks up. And if something goes wrong, your drone’s got a long way to fall. Stay under 50 feet for your first several flights. Work your way up gradually.
Not understanding orientation. When your drone faces away from you, controls feel natural — push right, it goes right. When it’s facing toward you, everything flips. Push right, it moves left from your perspective. This WILL mess you up. Guaranteed. The Mini 4 Pro has a “headless mode” that compensates, but I’d say don’t use it. Learn proper orientation from the start. Makes you a much better pilot long-term.
Ignoring return-to-home altitude. The Mini 4 Pro has an automatic RTH feature, loses connection or you hit the button, it climbs to a set altitude and flies back to the takeoff point. But the default RTH altitude might be lower than the trees or buildings around you. Set it higher than your tallest nearby obstacle before every flight. I once had my drone return to home straight through a tree canopy because I’d left RTH at the default 30 meters. Leaves everywhere. Drone survived, somehow. I was shaking for ten minutes.
Pushing batteries too far. At 30% the drone warns you. At 20% it warns you harder. Hit critical levels and it auto-lands whether you want it to or not. Start heading back at 30%. Land at 20%. The extra flight time you’re sacrificing is nothing compared to the risk of your drone dropping into a lake because you wanted one more shot. I may or may not have learned this particular lesson the hard way. The lake was cold. The drone was not waterproof.
Accessories: What You Actually Need vs. What’s a Waste of Money
Drone forums will have you thinking you need $400 worth of accessories before your first flight. You don’t. Most of it’s junk. Here’s the honest breakdown.
Worth buying: Extra batteries, the Fly More Combo comes with three, and three is the right number. A single battery gets you about 30 minutes of real flying (manufacturer numbers are always optimistic). Three batteries means roughly 90 minutes per session, which is solid. A landing pad, the collapsible $15 ones off Amazon work fine. Landing on grass or gravel kicks up debris that can wreck the gimbal and camera. ND filters if you’re doing video, they cut light hitting the sensor so you can use slower shutter speeds for that cinematic motion blur everyone wants. A MicroSD card, Samsung EVO Select or SanDisk Extreme, 128GB minimum. And a decent carrying case if your combo didn’t include one.
Don’t bother with: Propeller guards. I know, I know: controversial take. But prop guards add weight, cut flight time, catch wind, and give you false confidence. Obstacle avoidance on the Mini 4 Pro does a better job than plastic bumpers strapped to your props. Signal boosters or range extenders, the Mini 4 Pro’s OcuSync transmission already reaches 12+ miles, which is absurdly beyond legal visual line of sight. If you need more range, you’re already breaking the law. Flashy LED lights and decorative stickers that just add weight and look goofy. And “drone backpacks.” Just.. put the case in your regular backpack. You don’t need purpose-built luggage for something that weighs 249 grams.
Making Your Footage Look Good
Once you’ve got maybe 10+ hours of actual stick time, and I mean real practice, not just hovering in your yard, you can start thinking about cinematography. Here’s what frustrates me about most “drone footage tips” articles: they skip the most important thing. The difference between amateur and professional-looking drone video isn’t the drone. It’s not the resolution, it’s not the frame rate, it’s not the color grading. It’s how you move. Smooth, slow, deliberate movements. That’s it. That’s 80% of the battle right there.
The reveal shot is your bread and butter. Fly forward over a ridge, treeline, or building to reveal what’s behind it. Works because it builds anticipation and pays it off. Start low behind whatever obstacle you’re using, move forward and slightly up, let the view open up. Go slow. Slower than you think. The single most common beginner mistake is moving too fast. Slow always looks better than jerky.
The orbit — circle around a subject while keeping the camera locked on it. Mini 4 Pro has an automated orbit mode called “Point of Interest” that handles this for you. Set your subject, pick a radius and speed, let the drone do the work. Results are impressively smooth and look professional with almost no effort. Learn to do it on this auto mode first, then graduate to manual orbits with coordinated stick inputs.
The dronie is basically a drone selfie, fly backward and upward while the camera stays tilted down at you. Classic opener or closer for travel videos. There’s a QuickShot mode that does it automatically. Simple concept, surprisingly effective at showing off a location and giving a sense of scale.
Top-down shots, point the camera straight down, fly over interesting patterns. Roads, water, forests, farmland, geometric buildings. You can’t get this perspective without a drone (or a helicopter, I suppose). The more pattern and texture your subject has, the better it looks from directly above.
Keeping Your Drone Alive
Quick thing that seems like it should be obvious but apparently isn’t: drones need maintenance. After every session I do a two-minute check. Look at propellers for nicks or cracks. Wipe the camera lens with a microfiber cloth. Check the gimbal for wobble. Blow dust out of the motors with compressed air. Two minutes. Has saved me from multiple mid-flight failures.
Battery care is a big deal and most people get it wrong. Lithium polymer batteries degrade faster when stored fully charged or fully dead. If you’re not flying for a week or more, let them sit at about 60%. DJI batteries actually auto-discharge to storage levels after a configurable number of days, which is a nice touch. Store them at room temperature. Not your car. Not the garage. Not the attic. Heat and cold destroy batteries. I keep mine in a fireproof LiPo bag in my office closet because while LiPo fires are rare, they’re absolutely terrifying when they happen.
Firmware updates, just do them. DJI pushes updates that fix bugs, improve performance, and refresh geofencing databases. Don’t be that person who refuses to update because “it might break something.” It might break something if you don’t update. Connect to WiFi before you head out so the app can grab any pending updates at home instead of when you’re standing in a field with no signal.
Privacy and Not Being a Jerk About It
I’m going to be blunt because this topic makes me genuinely irritated when I see it handled poorly. Flying a camera over other people’s property raises real privacy concerns. “But the FAA says I can fly in navigable airspace”: yeah, okay, and your neighbor says they’re going to call the police if you hover over their pool again. Guess who wins that interaction in practice?
Many states and municipalities have their own drone privacy laws on top of federal ones. Some prohibit using drones for surveillance of private property. Others require consent before photographing people from a drone. Look up your local laws. Actually look them up, don’t just assume federal rules are all that apply.
And beyond what’s legal, basic courtesy goes a long way. Someone asks you to stop flying near their property? Stop. Don’t argue about airspace rights. Don’t quote regulations at them. Just land, go somewhere else. Every viral “drone peeping tom” video makes life harder for the rest of us. I tell my neighbors whenever I’m going out to fly, even though there’s no law saying I have to. Builds goodwill. Prevents panicked 911 calls.
A drone is a flying camera that sounds like an angry wasp. Respect the fact that not everyone’s going to be thrilled about it buzzing over their backyard barbecue.
What Comes Next
So you’ve got the drone, passed the TRUST test, practiced your basics, and you’re not crashing into fences anymore. Probably. Where do you go from here?
Join a community. The r/drones and r/DJI subreddits are decent, though they can get toxic in the way only Reddit can. The DJI Forum is useful for tech questions. And local drone clubs exist in most metro areas, great for finding flying buddies and scouting new locations you wouldn’t have found on your own.
Think about getting your Part 107, even if commercial work isn’t on your radar yet. The knowledge makes you a safer pilot, and the certificate opens doors you didn’t know existed. Real estate photography. Construction site mapping. Event coverage. Search and rescue volunteering. There’s a surprising amount of opportunity out there for licensed drone pilots.
Practice with intention. Don’t just drift around aimlessly. Set a goal before each session: “Today I’m nailing the orbit.” “Today I’m flying in 15 mph wind.” “Today I’m shooting a one-minute edit-ready video of this park.” Targeted practice beats random flying every single time. Could be wrong, but from what I’ve seen, the pilots who improve fastest are the ones who treat each battery like it has a purpose.
And honestly? Just enjoy it. I know I’ve spent most of this post being annoyed at bad advice and reckless beginners, but the reason I care so much is that this hobby is genuinely one of the best things I’ve picked up in years. Seeing the world from above, getting perspectives that regular people couldn’t access even a decade ago, discovering patterns and beauty in landscapes you’ve walked past a thousand times without noticing, it changes how you look at places. I still remember the first time I flew over a coastline at sunset and watched the footage back on a big screen. That feeling hasn’t gone away, even after hundreds of flights.
Which actually reminds me — I’ve been meaning to write something about the whole FPV drone scene, which is this completely different rabbit hole from the cinematic stuff I’ve been talking about. FPV (first-person view) drones are these tiny, fast, manual-control machines where you fly wearing goggles and it feels like you’re actually in the air. No GPS hold, no obstacle avoidance, no safety nets. Just you and a stick and a drone doing 80 mph through a gap in a parking garage. I tried it last month and nearly threw up from the motion sickness but also couldn’t stop grinning. It’s this weird mix of terrifying and addicting that I think might actually be a completely different hobby wearing the same name. Maybe I’ll write that one up next. If the cat lets me back outside.

(0) Comments